
System Science - Part 6: Physical Features
The Additional Factors That Contribute To A Great Interface.
When you’re choosing an audio interface, core features such as sound quality, driver performance and expansion potential will be your biggest concerns. When you’ve figured out your needs in these areas, however, you might well find that there are quite a few products that seem to meet them — at least on paper. In this situation, it will often be other factors that guide your decision-making. In this article, we’ll look at some of the most important of these.
Form Factor
Broadly speaking, audio interfaces come in two forms. Most interfaces that offer more than a handful of inputs and outputs are packaged in 19-inch rackmount cases, a standard format that allows them to be placed neatly in a rack along with other studio equipment. Typically, all of the controls will be on the front, along with headphone sockets and perhaps a couple of audio inputs, while the majority of the connections will be on the reverse. However, many home studio owners have no other rackmounting gear, and only need a couple of inputs and outputs, so smaller interfaces are normally designed to be placed conveniently at hand on a table top next to the computer keyboard. There’s less uniformity in the design of ‘desktop’ interfaces, and some manufacturers place controls on top of the unit as well as on the front panel. Desktop interfaces are smaller and more portable than their rackmount cousins, but this usually just reflects the fact that they have fewer inputs and outputs.
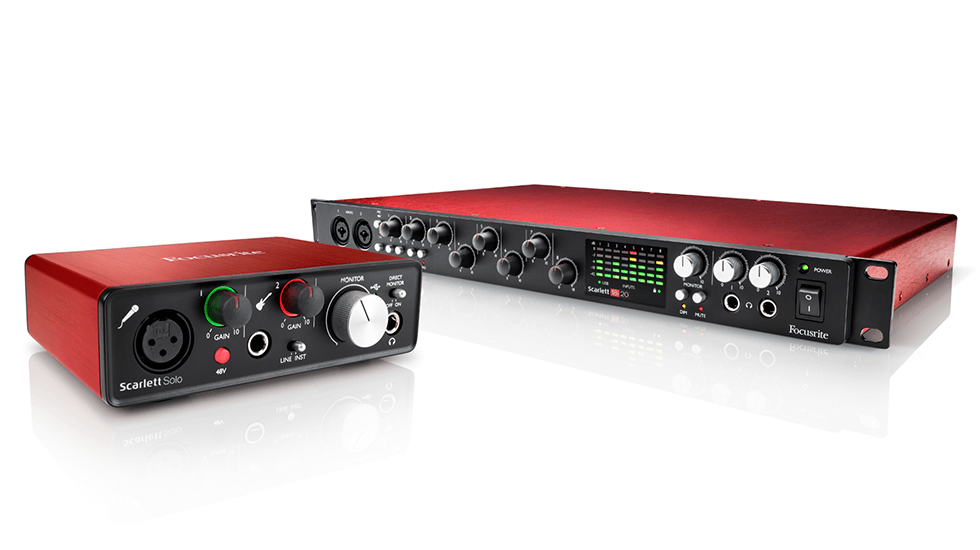
Interfaces with only a few inputs and outputs, like Focusrite’s Scarlett Solo (left), usually come in a ‘desktop’ format, but more comprehensive devices like the Scarlett 18i20 are designed to fit into a standard studio 19-inch rack.
If your needs are fairly basic, or you’re setting up a bedroom studio, you might well find that a desktop interface is more convenient, but as your needs grow, there will come a tipping point where the advantages of the rackmounting format become compelling. It keeps all the messy cabling out the way, and when you do need to move your system around for location recording and so on, you can easily protect it in a robust flightcase.
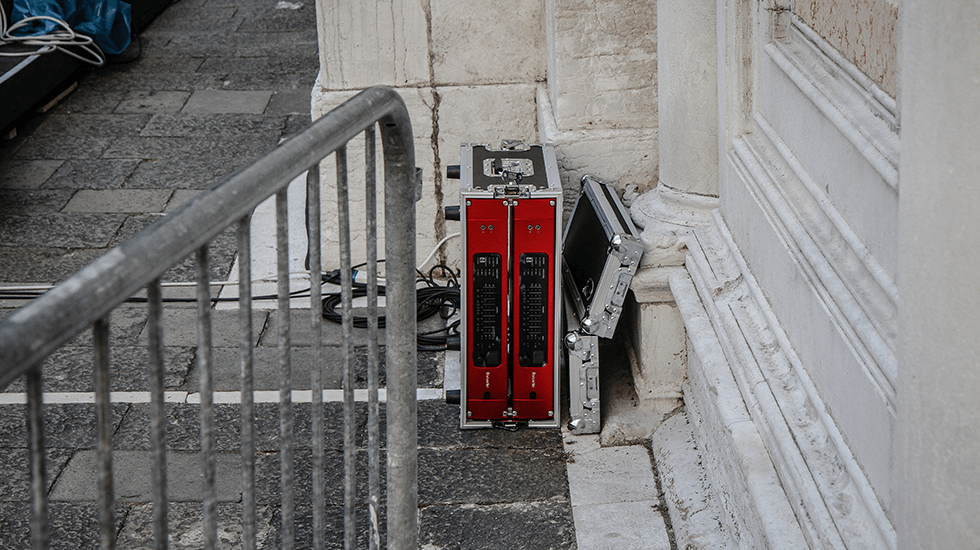
As well as studio racks, the 19-inch format means that audio interfaces can be fitted into robust flightcases to protect them on location and on the road.
Power Supply
Audio interfaces all need electrical power to work. There are three basic ways in which this can be supplied. Small interfaces with only a couple of inputs and outputs can be ‘bus powered’, drawing all the power they need from the USB or Thunderbolt connection to the computer. This has obvious advantages in terms of portability, and in particular, allows you to work with a laptop even where there is no mains power available. The flip side is that there simply isn’t enough power available over a typical USB connection to drive a more fully featured audio interface. Even basic interfaces often suffer from compromises such as lower headphone volume or the non-availability of phantom power for microphones when they are bus-powered.
Where bus powering isn’t an option, a power supply is required to bring the mains supply down to a voltage suitable for powering the interface’s circuitry. Many rackmounting interfaces have the power supply built in, meaning that all you need is a standard IEC mains cable (often wrongly called a ‘kettle lead’). Most desktop interfaces, however, use an external power supply resembling that used with a laptop or mobile phone charger. Many interfaces that are capable of being bus-powered come with such a power supply as an alternative, particularly where they can’t be operated at their full potential from bus power.

All of Focusrite’s rackmount audio interfaces have an in-built power supply. It’s common to see external power supplies used in smaller interfaces due to space constraints, and in cheaper rackmount interfaces.
Using an external power supply allows the interface itself to be made smaller and to be put together more cheaply, but can be inconvenient and present long-term reliability issues. It also means that if the power supply is lost or broken, your interface becomes a doorstop until you can replace it — which is not always easy. Building the power supply into the case of the interface is generally a better solution, but it’s also more difficult and expensive from an engineering perspective, so internal power supplies tend to be a mark of premium interfaces.
Monitor Control
If you are planning on pairing your audio interface with an analogue mixing console, you probably won’t want lots of mic preamps built into it: you’d use the preamps on the console, and feed its channels or buses into line-level inputs on the interface. And at the other end of the signal chain, you’d expect to feed line-level outputs straight into the mixer and use its master section to handle volume control, speaker selection, mute, dim, talkback and so forth.
If you’re lucky enough to have a large-format recording console in your studio, monitor control can be handled from its master section. If not, will your audio interface offer enough monitor-control features to replace it?
However, this sort of console-based setup is common only in reasonably large studios. Most audio interfaces intended for home and project studios are designed to be used without a mixer attached, so they have their own preamps built in. But what provision do they make for replacing the master section of an analogue console? The answer can vary quite a bit.
Nearly all audio interfaces that have analogue outputs have at least some way of controlling their level, almost always using rotary knobs. It’s important to note, though, that there are two types of knob in common use. One is the more traditional potentiometer (variable resistor), which has a fixed start and end point, and operates on the output signal after it’s been through the digital-to-analogue conversion stage. The other is the so-called ‘rotary encoder’. This is a digital control, and often has no end points to its travel, so it can be spun around and around until you get bored.
Unlike a potentiometer, a rotary encoder can be (and often is) assignable, meaning that the encoder has no one fixed function, but can be switched to change multiple parameters. In some cases it’s also possible to operate an encoder as a button to activate a secondary function. This means that a single rotary encoder could, for example, operate as a main volume control, a headphone volume control and a mute button.
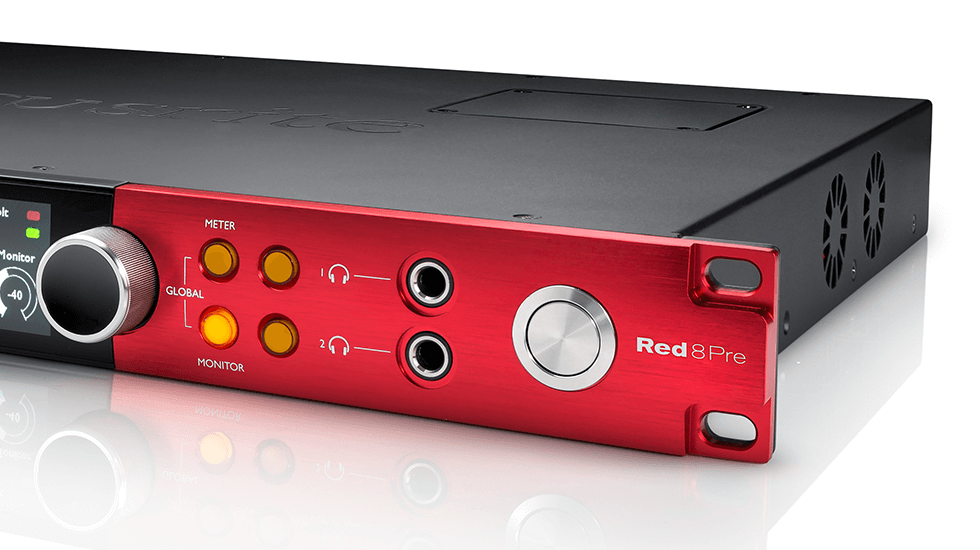
On Focusrite’s Red interfaces, a single high-precision rotary encoder offers control not only over the main monitor level, but also both headphone outputs too.
Pots & Kettles
From both an ergonomic and a technical point of view, both designs have their pros and cons, although many of these are dependent on exactly how they’re used in a given product. Cheap potentiometers don’t always have a very linear response, which can make it hard to precisely set the level you want, and at low levels, level matching across channels can be imperfect. On the plus side, however, they always operate on the full-range digital signal, and if something goes badly wrong and your computer starts spitting out deafening noise, an analogue gain control will always give you a way of turning it down!
Digital level controls are more versatile: not only is a single control often assignable to multiple parameters, but you can control the level of multiple outputs at once, which is vital in a surround monitoring system. They can also be set more precisely, which is an advantage if you want to work in a calibrated monitoring environment. However, a volume control that works in the digital domain can compromise sound quality. By turning the output down before it reaches the D-A converter, you are reducing the word length of the digital signal, so you might find yourself listening to 12-bit sound! In other words, attenuating your signal in the digital domain reduces the dynamic range of that signal.
From an engineering and sound quality perspective, then, the best solution of all is a hybrid one, as employed in Focusrite’s Red interfaces. This uses a digital rotary encoder to control levels, but the control itself happens in the analogue domain; it’s of a similar nature to the digitally controlled preamps used in the Red interfaces.
If you’ve ever used a large-format analogue console, you’ll know there is a lot more to the master section than simple level control. By no means all master-section features are relevant to stand-alone audio interfaces, but some of them can be very useful, and it’s well worth considering which ones you might need. As well as mute, dim and mono fold-down, they include the ability to switch between two or more sets of monitor speakers, ideally with the option to apply a level offset to the second pair so as to match the apparent volume, and talkback, which allows the engineer to communicate with performers in another room. Relatively few audio interfaces implement all of these features, and those that do so often require them to be operated from the computer rather than the front panel, so if you have complex needs in this department, you might be better off buying a separate monitor controller to handle them.
Metering
Our most important tools for making judgements about recording quality are our ears, but we also rely heavily on our eyes, especially when it comes to tracking down faults and setting levels. For this reason, most audio interfaces offer at least some visual feedback on the signals that are going in and out of them, although there is wide variation in the form this takes.
Some interfaces offer very minimal metering, perhaps amounting just to a ’signal present’ LED on the analogue inputs. This makes them cheaper to build, and some would argue that extensive hardware metering is not really necessary in a computer-based recording context in any case. Our recording software, third-party plug-ins, and the control panel/mixer utilities provided with most audio interfaces offer much more detailed and comprehensive metering than could ever be provided on the front panel of a single-unit rack-mounting interface.
This is not an argument that convinces everyone, though, and there are situations where relying only on software metering can get you into trouble. It won’t help with troubleshooting in situations where no signal is appearing in your recording software, for example, and might mean you miss problems that occur in the analogue domain before the signal reaches the A-D converter. And many people simply prefer not to look at the computer screen all the time, or use it to view the recording software’s arrange window rather than its mixer.
The majority of multi-channel interfaces thus tend to feature ‘ladder’ metering displays with between five and ten LEDs for each channel. These are usually configured in a ‘traffic light’ colour scheme where the topmost LED lights up red to warn of clipping, meaning that you need to turn down the gain in order to make a clean recording. The next one or two will be amber, indicating that there is a risk of running out of headroom, and the remainder will be green. The exact levels at which each LED is triggered vary, but in general, you should aim to set gain controls such that signals only occasionally go into the amber and absolutely never into the red.
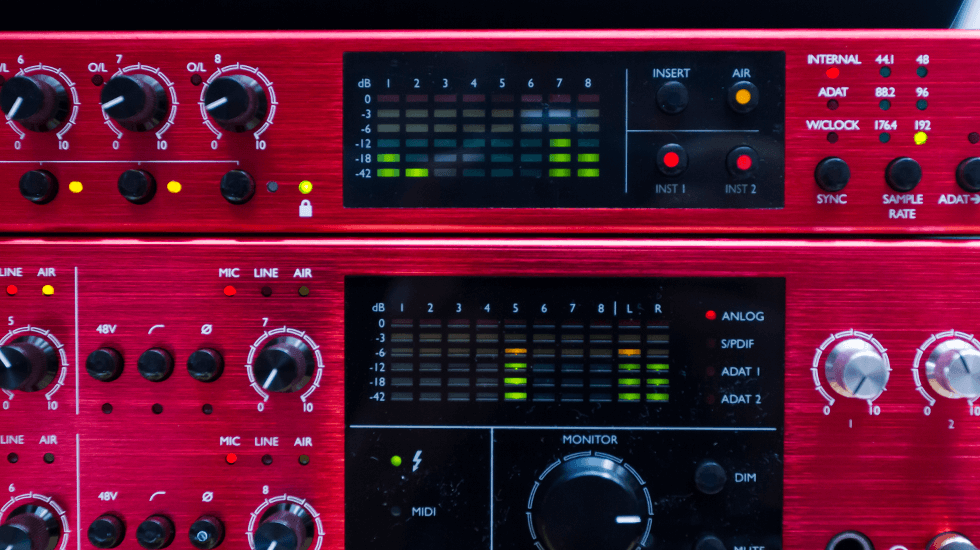
Green means go, red means stop, amber means caution: hardware metering can be invaluable in setting levels appropriately.
A typical multi-channel audio interface might have eight such ladder displays for its analogue inputs, plus an additional pair showing the levels at the main outputs. However, some also allow the meters to be switched so that they show the levels at the digital inputs, which can be useful.
In high-end interfaces such as Focusrite’s Red range, you’ll often find even more sophisticated and versatile metering options. Rather than using the simpler LED ladders, the Red 4Pre, Red 8Pre and Red 16 Line feature separate full-colour, high-resolution screens for metering input and output levels, along with a third that is dedicated to preamp and input settings. This means they come much closer than most interfaces to conveying all the detail that is on offer in software metering.
Less Is More
Many of the features we’ve looked at so far could be thought of as being primarily about ergonomics: their goal is to make the interface as fast and easy to work with as possible. If this is a consideration for you — and it should be — it’s vital to remember that the same considerations apply to any software that is needed to use the interface.
Many manufacturers make a big song and dance about the power and flexibility of the internal mixing features within their interfaces, and the control-panel utilities that are needed to configure them. Some of these are easily as deep and complicated as a stand-alone digital mixer — yet they completely lack the hands-on tactile control that a ‘real’ mixer provides. As a result, sophisticated control-panel utilities present an intimidating learning curve, and may well implement the same features as your recording software in confusingly different ways.
However, if your audio interface is capable of operating at very low buffer sizes, and hence without noticeable latency, there is absolutely no reason why you should need to learn how to use a complex mixing and routing utility. Focusrite believe all of that is better handled within your recording software, which is why the Focusrite Control utility that comes with all of Focusrite’s current products is intentionally simple and uncluttered.
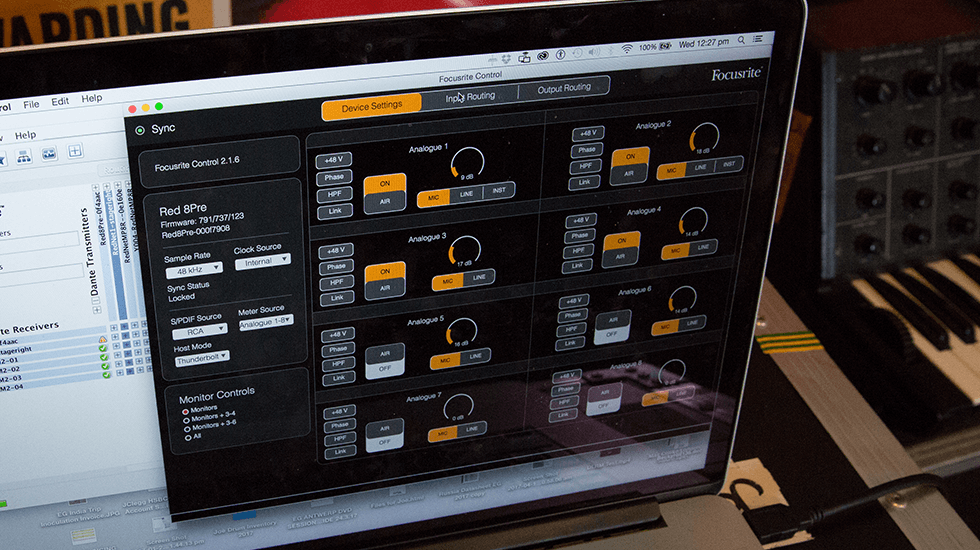
Focusrite Control is designed to keep everything as simple as possible, because the low latency offered by Focusrite interfaces means that complex cue-mixing and routing needs can be handled in your recording software.
Further Reading: Sweetening The Deal
Many audio interfaces come with a software bundle as well as the physical interface. This, naturally, includes any drivers and control-panel software needed to operate the interface, but it can go much further than this. It may, for instance, include recording software — usually a cut-down version of one of the well-known packages such as Steinberg’s Cubase — and/or effects and processing plug-ins. Most people already have recording software and don’t install the free, cut-down versions that are bundled with audio interfaces, but the plug-in packages can be a very valuable addition to your setup. Focusrite’s interfaces come with one or more of the Midnight, Scarlett and Red plug-in bundles, all of which offer premium-quality EQ and dynamics.
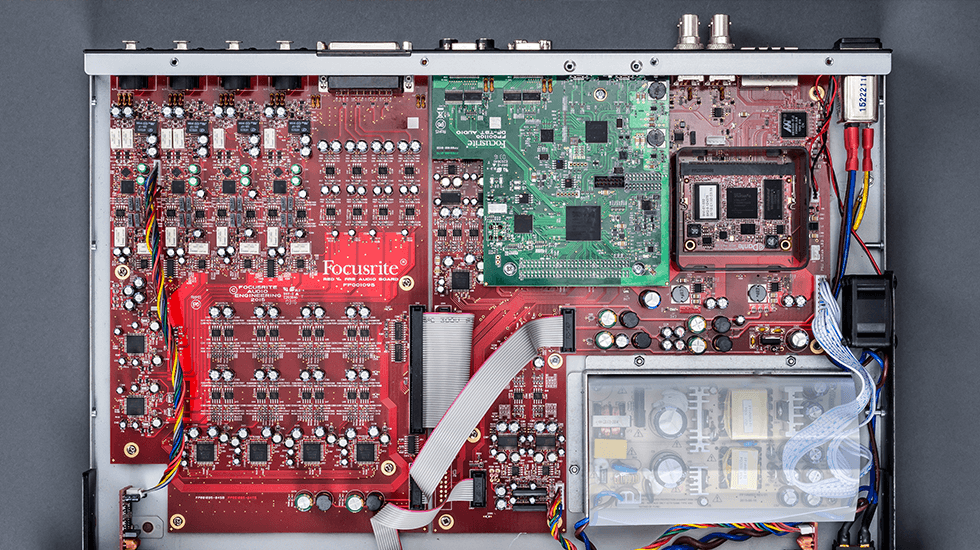
The uncompromising design principles behind the Red 4Pre mean that its case is very full of electrical components, which generate a lot of heat. Air is drawn through the internals by a fan, center-right.
Further Reading: Fan Friction
Almost all of the electrical power that is used by an audio interface ultimately ends up as heat, which needs to be dispersed in order to prevent damage to the components within the interface. Most interfaces manage to keep their internal temperature within safe limits through ‘passive cooling’, which means transferring the heat to the metal case that houses the interface, and thus into the air around it. However, this isn’t always sufficient, and in no-compromise designs such as the Focusrite Red range, more heat is sometimes generated than can be dispersed passively. For this reason, complex high-end interfaces often have an internal fan to drive cool air through the case. Care is usually taken to make these fans operate quietly, but they are rarely completely silent, and although this isn’t an issue when the interface is being used in a control room away from the main recording area, it can cause problems when you need to record quiet sources with the interface in the same room.
Words: Sam Pryor